Video Collections
 Edit on GitHub
In this section, we'll look at how we can provide options to the video player using both JavaScript and HTML.
Then we'll look at Video Player functionality that is not available with the HTML5 Video tag. We'll see how Cloudinary Video Player is built on Video.js, but provides additional functionality such as on the fly transformations. We'll focus on the Video player's ability to provide collections of video in various ways.
Video.js provides a basic video player. There are many plug-ins that can be used to add features. Here's a set of feature you can look for in the Cloudinary video player:
- Skinning the player
- Adding your own logo
- Playlists
- Autoplay on Scroll
- Recommendations
- Info data overlay
- Inserting Ads
- Google Analytics
- Adaptive Streaming
- Transformations
Video Player Options
You can apply video player options in HTML using the data- attributes or in JavaScript. The table below lists and compares how you could apply these options in each language. You'll see these options applied in both languages.

See the options as attributes in HTML
<videoid=”demo-player”width="500"class=”cld-video-player”data-cld-font-face="Arial"></video>
... and in JavaScript
const demoplayer = cld.videoPlayer("demo-player",{autoplay: false,muted: true,controls: true,transformation: [{ width: 500, crop: "fit" },{overlay: "video-logo",width: 100,gravity: "north_east",x: 5,y: 5,opacity: 70}]});demoplayer.source("rooster");
Exercise: Upload Collection of Videos
Upload a logo to be used as an overlay.
node video-player/upload-video-collection.js
Upload a set of four video that are tagged as 'skiing'.
node video-player/upload-video-collection.js
Notice the upload includes an eager transformation to change the aspect ration to from 16:9 to 1:1.
let result = await cloudinary.uploader.upload(filename, {use_filename: true,tags: "skiing",unique_filename: false,type: "upload",overwrite: true,invalidate: true,resource_type: "video",aysnc: false,eager:{crop: "fill",width: 300,gravity: "auto",aspect_ratio: "1:1"}})
Working with Lists of Videos
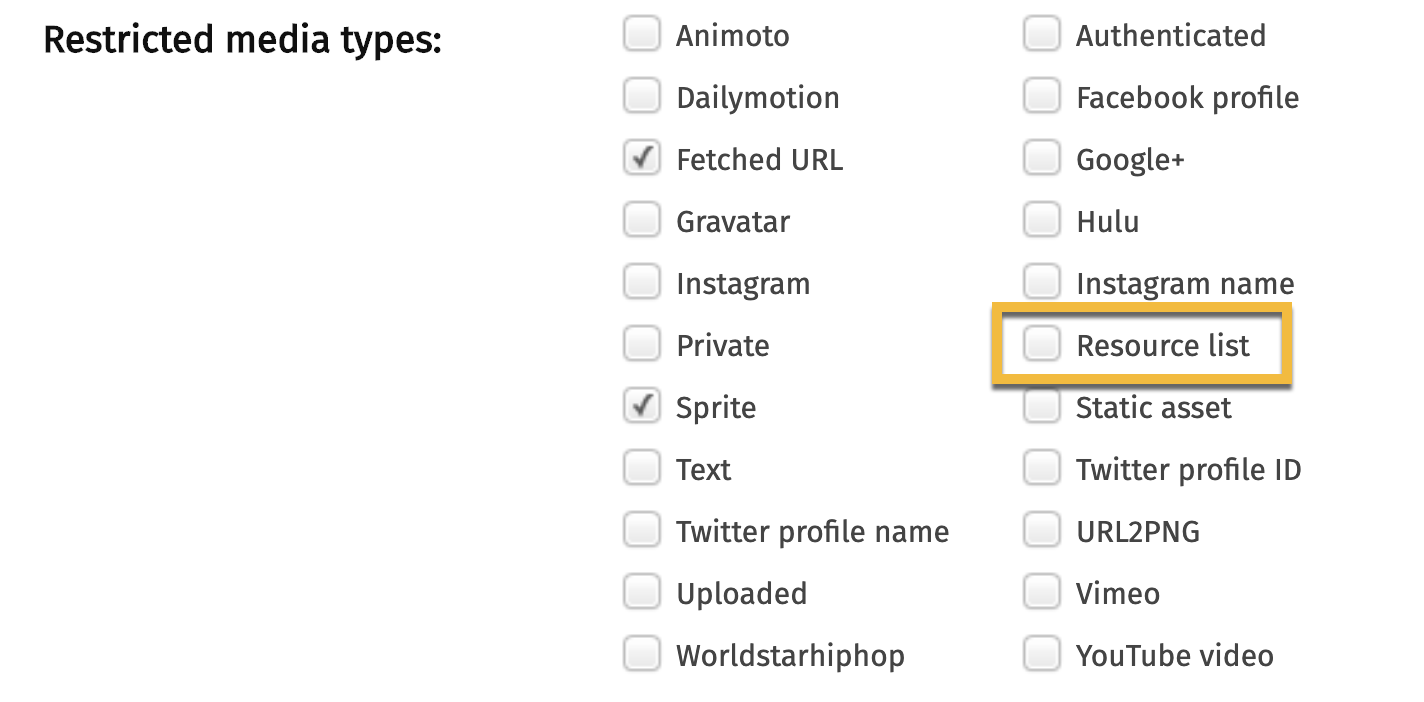
You'll need to un-check the Resource List in order to allow gathering resources by list as we'll do in the next exercise.
We're going to experiment with 3 ways to work with collections of videos using the Video Player:
- Playlists
- Autoplay on Scroll
- Recommendations
Exercise: Playlist
Add your cloud name to the video-player/playlist/index.html file. You'll find the cloud name specified in the script. Open in page in the browser to see how this playlist functions. You should see a Video Player with a Playlist rendered on the right.
var cld = cloudinary.Cloudinary.new({cloud_name: 'cloudinary-training'})
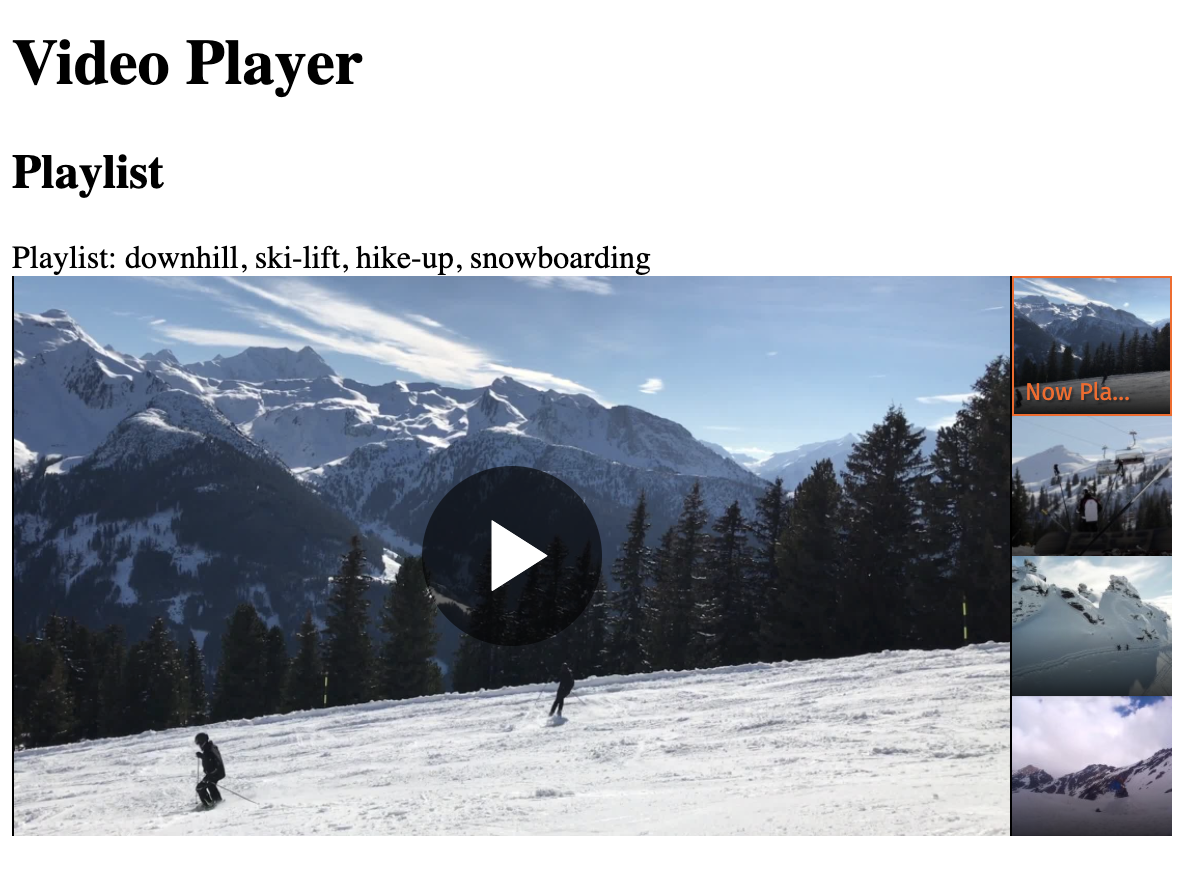
The HTML provides some options. There is an on the fly transformation to crop the video to the size of the container. The playlist-data will display information taken from data in the playlist itself. This is data is available to provide more information about the playlist on the page.
<div id="playlist-data"></div><div style="max-width:400px"><video id="example-player" controls muted class="cld-video-playercld-video-player-skin-dark" data-cld-transformation='{ "width":400, "crop": "fill"}'></video></div>
Initialize the video player and add a playListWidget. This is the list of videos you see on the right of the display. The widget can be set in a horizontal or vertical orientation using the direction option. The number of items shown is can be set with the total option. You can modify these options to see the effect.
var player = cld.videoPlayer('example-player', {playlistWidget: {direction: 'vertical',total: 4}})
We're using the playerByTag function to collect up all of the videos that have the skiing tag. The autoAdvance options is set to false. This causes the video to stop once it has played and allow the user to select which video in the playlist to play next. The repeat function is set to true, so that it doesn't fall off of the playlist widget once it has finished playing.
Once the playlistByTag function has completed, we can access data about the playlist in the promise success. In this case, execute two chained functionsf playlist().list() to get a list of information about the playlist videos. Then we extract the public id's, concatenate them and bind them to a the playlist-data element set up in HTML.
player.playlistByTag('skiing', {autoAdvance: false,repeat: true}).then(function (player) {console.log("player object",player)// we can add summary data from the playlist object in the player// to our webpagelet divElem = document.querySelector("div#playlist-data");let list = player.playlist().list().map(source => {return source.publicId()}).join(', ');divElem.innerText = "Playlist: " + list})
Exercise: AutoPlay on Scroll
Add your cloud name to the video-player/autoplay/index.html file. You'll find the cloud name specified in the script. Open in page in the browser to see how this autoplay on scroll functions. You should see multiple video players rendered to the page. As you scroll a video player into the viewport, it starts to play.
Note: Chrome and iOS won't autoplay unless the video attributes include muted.
var cld = cloudinary.Cloudinary.new({cloud_name: 'cloudinary-training'})

Running multiple players on a page
In previous examples we've use the id attribute to identify the video player in JavaScript. The video player provides a videoPlayers function. This function allows you to specify a CSS class as a selector so that the player can be instantiated across all instances of this class on a page.
In order to activate the "autoplay on scroll" functionality, we can set the autoplayMode to on-scroll. We also set the preload option to auto so that the video will be loaded when the user scrolls to it.
const players = cld.videoPlayers('.cld-video-player', {autoplay: true,muted: true,loop: true,controls: true,autoplayMode: 'on-scroll',preload: 'auto'})
The videoPlayers function returns an array of players. In order to provide multiple sources to this array we create an array of sources which contain information about each video to be played on the page. The code below shows the information provided for the first video in this example. It contains publicId and an info object. This information could be read from an external source. When you hover over the video, the title and subtitle appear on top of the video. The sources are positioned in the array in the order we want them to appear on the page.
const sources = [{publicId: 'downhill',info: {title: 'Downhill',subtitle: 'Downhill skiing',description: 'Snow'}}]
We can assign these video sources to the players array.
players.forEach((player, index) => {player.source(sources[index])})
Exercise: Recommendations
Add your cloud name to the video-player/recommendations/index.html file. You'll find the cloud name specified in the script. Open in page in the browser to see how this autoplay on scroll functions. In this example, when a video player finished running a set of thumbnail recommendations will be displayed on top of the video.
const cld = cloudinary.Cloudinary.new({cloud_name: 'cloudinary-training'});
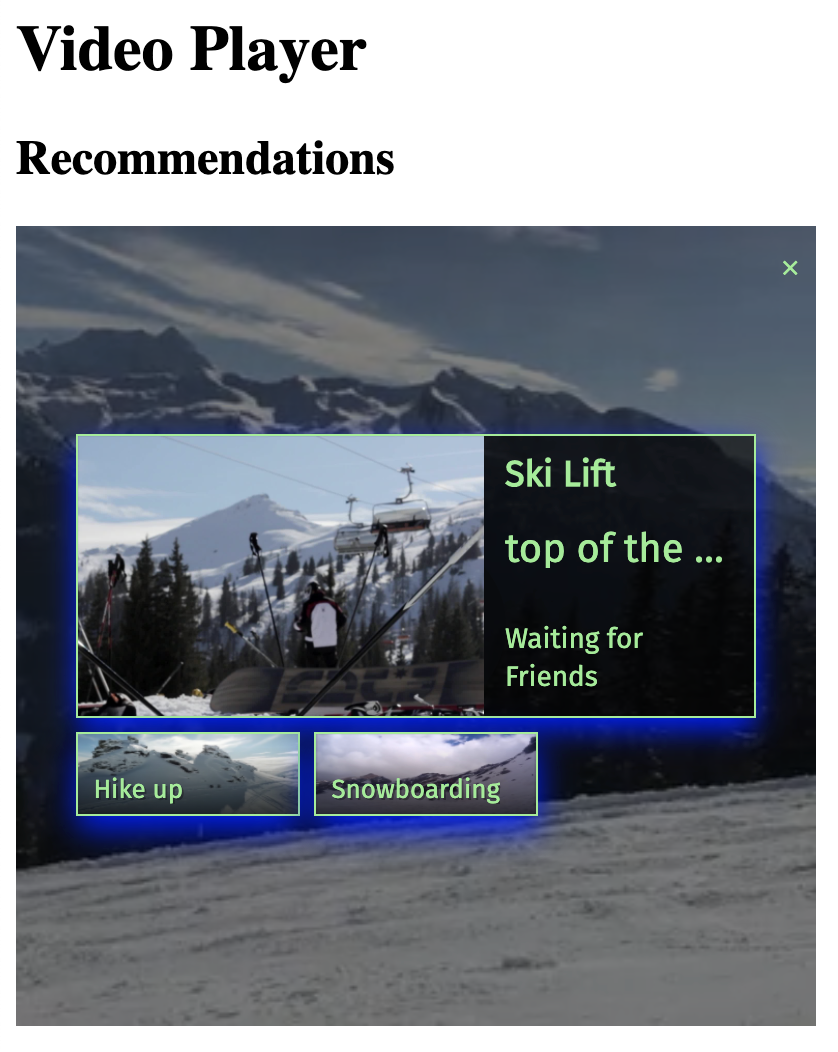
Setting up recommendations
We start by setting up sources similar to what we did with the autoplay on scroll example.
const source1 = {publicId: 'downhill',info: {title: 'Downhill',subtitle: 'Downhill skiing',description: 'Snow'}};
Instead of collecting them in a array, we create arrays of recommendations for each of the sources. These recommendations provide the information needed to set up the thumbnail recommendations. These recommendations could have their origin in an external recommendation engine and fetched by the web application.
source1.recommendations = [source2, source3, source4];source2.recommendations = [source1, source3, source4];source3.recommendations = [source1, source2, source4];source4.recommendations = [source1, source2, source3];