Video with AI
 Edit on GitHub
In this module we focus on using Add-ons that provide AI Services when working with video.
We'll look at solutions for image upload workflows:
- Create video subtitles and captions using Google Vision
- Google AI Video Moderation for User generated content
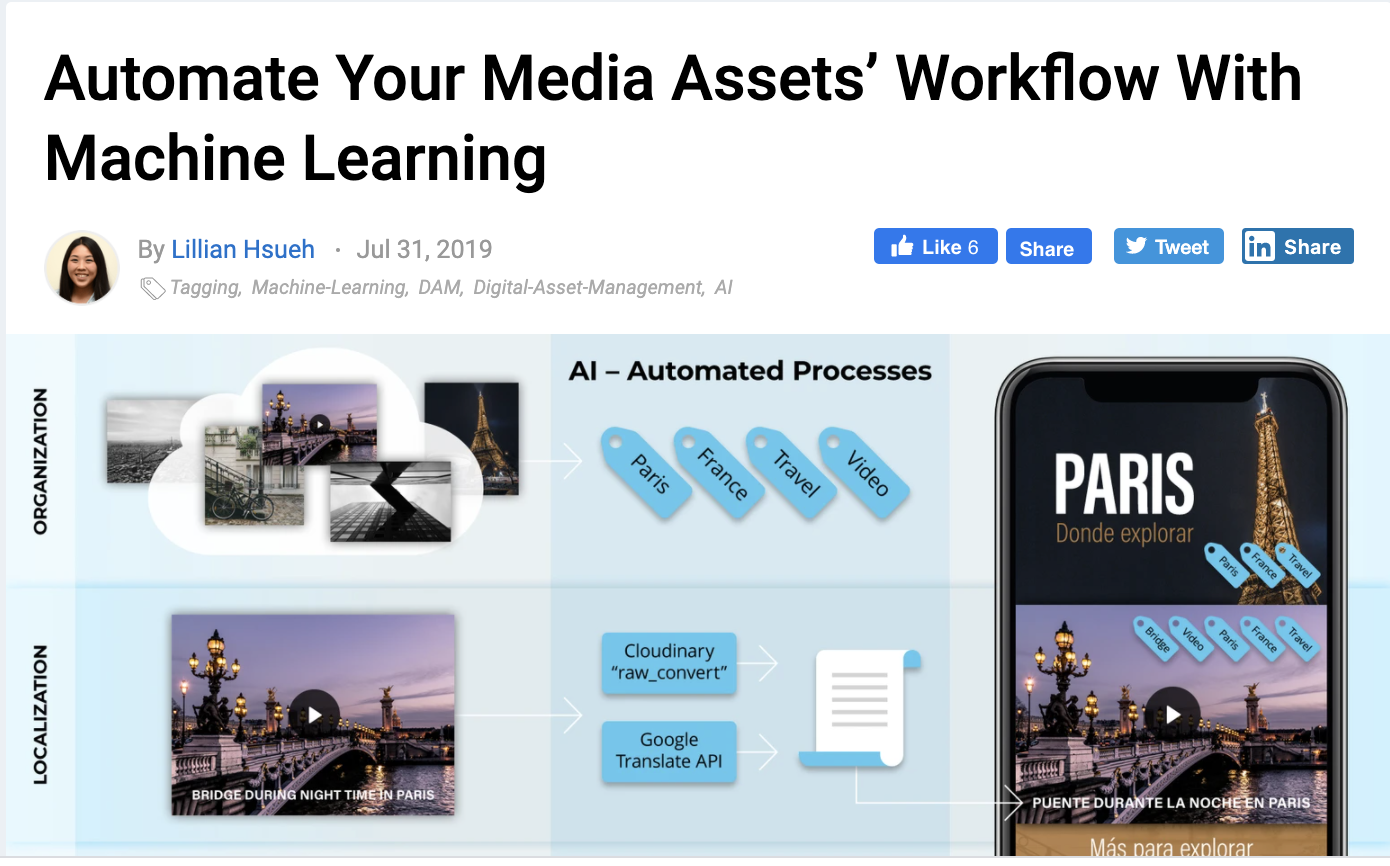
I recommend this background reading: Automate Your Media Assets’ Workflow With Machine Learning.
Video Subtitles and Captions
Translation?
Cloudinary offers a tag translation Add-on. If you want to translate video transcriptions look into incorporating a Translation API such as Google Translate, Yandex, or Watson.
Google AI Video Transcription
We can use Google AI Video Transcription to create both subtitles and captions. The difference between subtitles and captions is that captions may include sounds besides people talking, such as "dog barking", where as subtitles are strict text translations of what is being said.
Google AI Video Transcription Add-on
To begin, you need to add the Google AI Video Transcription Add-on.
Navigate to the Add-ons page in and select the free plan.

Subtitles
There can be substantial cost associated with creating subtitles manually. Using Google AI Video Transcription, or Microsoft Azure Indexer, to create the text and then the Cloudinary subtitle overlay option to apply the subtitles to the video can reduce costs. We can use transformations to position and style the subtitles.
The Google AI Video Transcription Add-on uses the Google Speech API. We’re going to use the transcribed video to create subtitles in this exercise. Subtitles are essentially text overlays and we can use SRT or VTT files to provide the text content. Google will create these files for us using the Cloudinary Upload API.
SRT and VTT are different formats for capturing text transcription and timing.
- SRT: Subrip Text Format
- VTT: Video Text Tracks
Exercise: Create subtitle and caption files
To create video transcription using the Google Add-on, execute
node user-upload-workflow/google-video-transcription/create-transcriptions
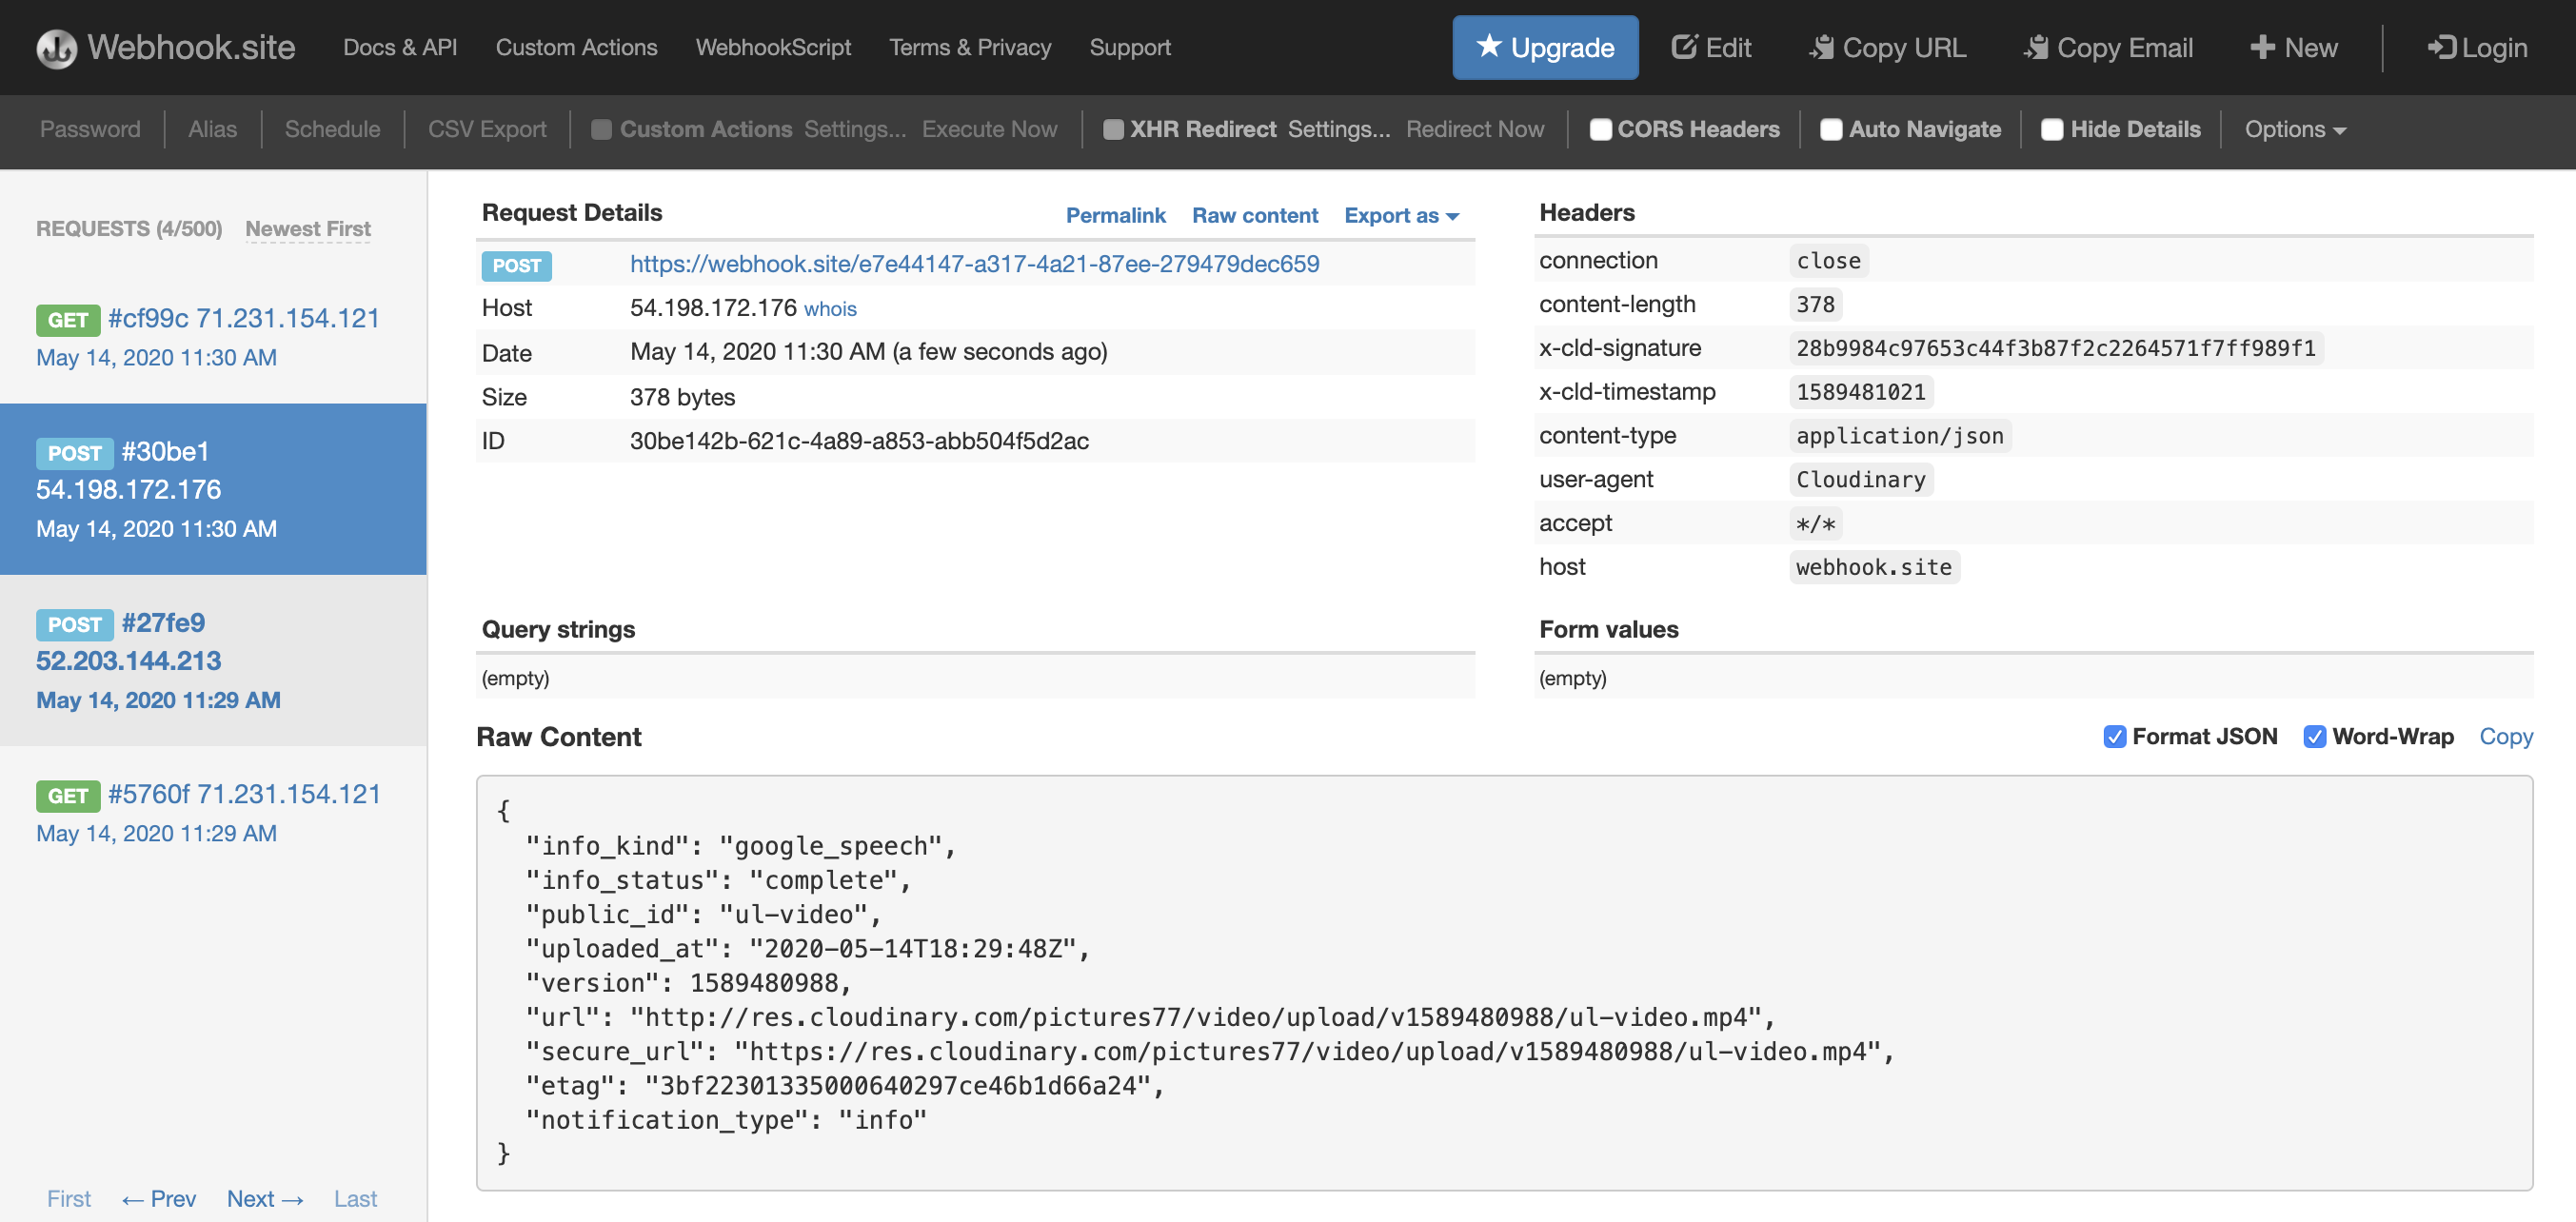
The transcription is triggered by the raw-convert: google_speech:srt:vtt option. There is a webhook that can help us to see when transcription is complete.
We're generating both transcriptions file types: SRT and VTT. We'll use the SRT for the subtitles and later, the VTT for captions.
cloudinary.uploader.upload('./assets/video/UnderwritersLaboratoryPsa.mp4', {resource_type: 'video',public_id: 'ul-video',raw_convert: 'google_speech:srt:vtt',notification_url:'https://webhook.site/c49e5d9e-15dd-43c0-b3c1-9e744d92cdbe'}).then(result => console.log(result)).catch(error => console.log(error))
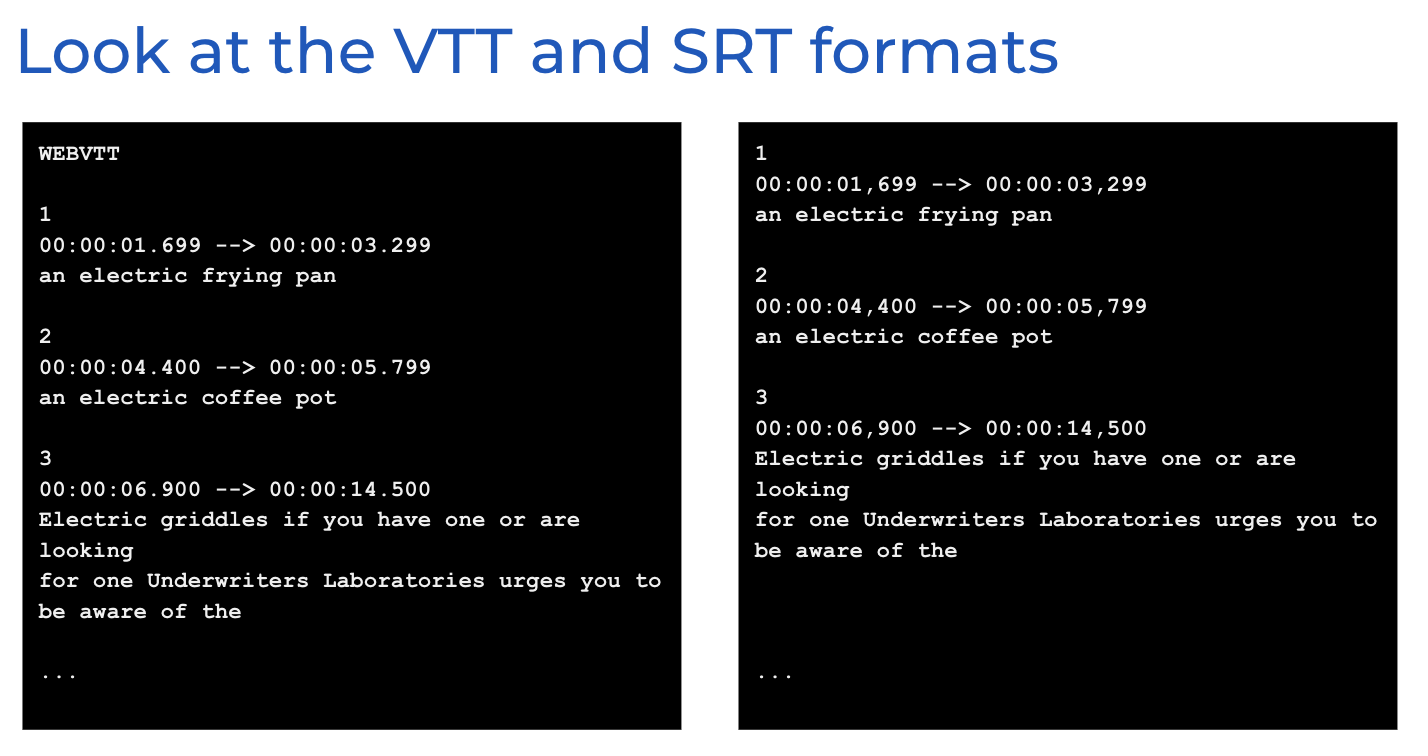
You can see similarities between the VTT and SRT files. The VTT file format is show on the left. Both formats provide a numbered list of transcribed text that are paired with a start and end time. You can manually modify these files. You can use the start and end times to pair the text with what frames are show on the video.
If you look in the Media Library, you'll see that 5 files were created during the upload.
Both SRT and VTT have duplicate .en-US files which indicate the transcriptions awareness of the language.

You also get a .transcript file which is a JSON formatted file that provides ML confidence reporting. There is also word for word mapping to start and end time.
{ "confidence": 0.0, "transcript": "", "words": [] },{"confidence": 0.8454251289367676,"transcript": "an electric frying pan","words": [{ "word": "an", "start_time": 1.7, "end_time": 1.9 },{ "word": "electric", "start_time": 1.9, "end_time": 2.4 },{ "word": "frying", "start_time": 2.4, "end_time": 2.8 },{ "word": "pan", "start_time": 2.8, "end_time": 3.3 }]},
Exercise: Apply SRT for subtitles
Let apply subtitles to the video.
user-upload-workflow/google-video-transcription/subtitles/video-tag-with-subtitles.js
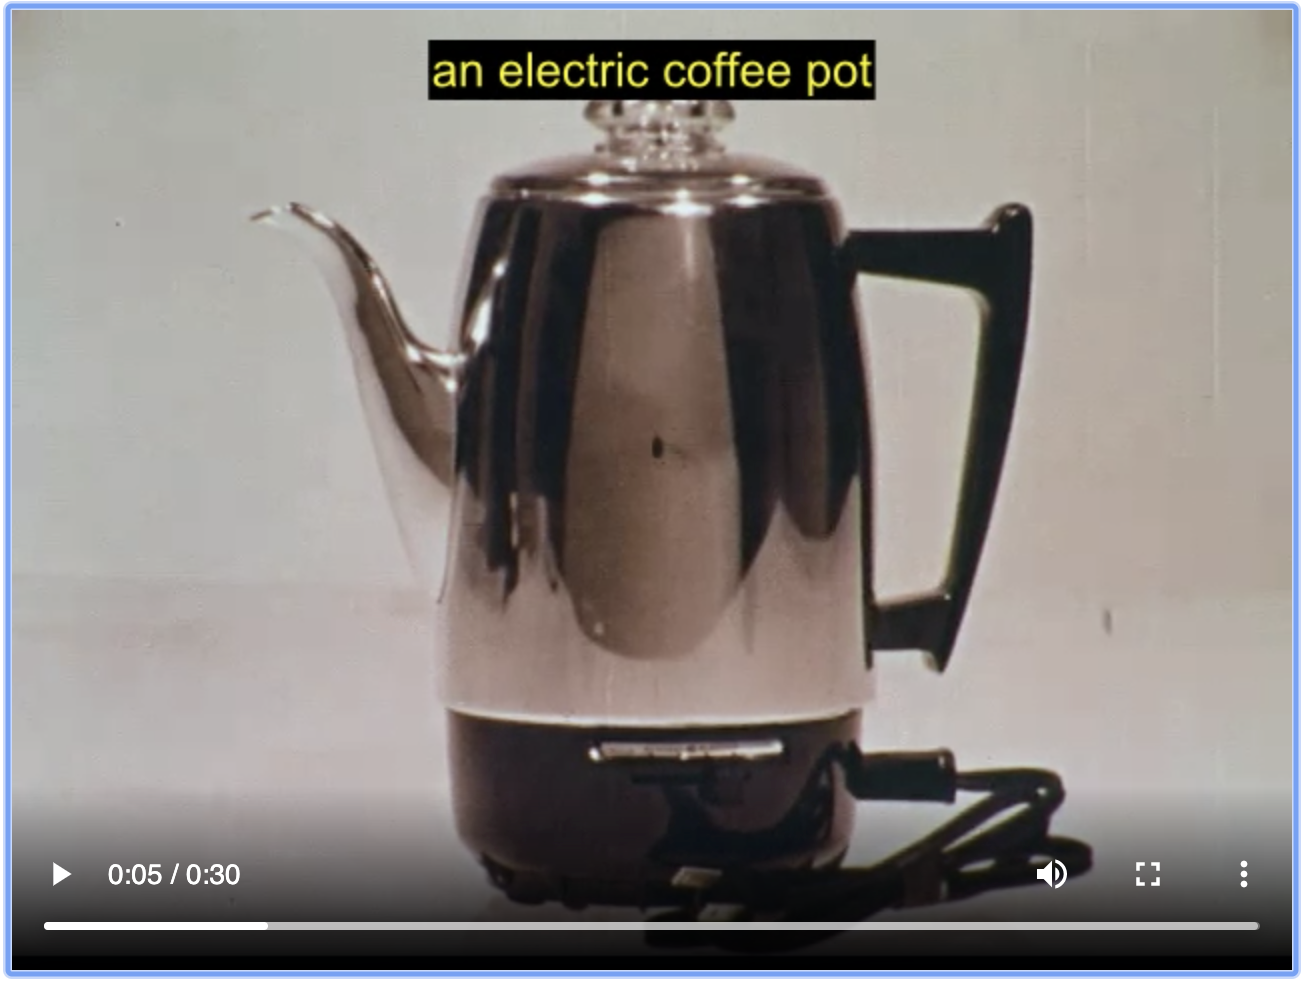
We can use the familiar overlay option to apply subtitles with the video helper in the SDK. We're using the .srt file. Notice we can apply the same kind of text transformations that we have previously used with other text overlays. We'll be looking for yellow on a black background positioned at the top of the video for this example.
const video = cloudinary.video('ul-video', {overlay: {public_id: 'subtitles:ul-video.srt'},controls: true,background: 'black',color: 'yellow',gravity: 'north'})console.log(video)
You can copy past the video tag created above into the index.html file and then see the subtitles.
user-upload-workflow/google-video-transcription/subtitles/index.html
<video controlsposter="http://res.cloudinary.com/pictures77/video/upload/b_black,co_yellow,g_north,l_subtitles:ul-video.srt/ul-video.jpg"><sourcesrc="http://res.cloudinary.com/pictures77/video/upload/b_black,co_yellow,g_north,l_subtitles:ul-video.srt/ul-video.webm"type="video/webm"/><sourcesrc="http://res.cloudinary.com/pictures77/video/upload/b_black,co_yellow,g_north,l_subtitles:ul-video.srt/ul-video.mp4"type="video/mp4"/><sourcesrc="http://res.cloudinary.com/pictures77/video/upload/b_black,co_yellow,g_north,l_subtitles:ul-video.srt/ul-video.ogv"type="video/ogg"/></video>
When you add the video tag the is using your cloud to index.html, you should see the yellow on black subtitles in this video.
This is an HTML 5 video tag, so you don't have many styling options.
Exercise: Add Captions
In this exercise, you're going to use a Video Player to render captions.
Execute this script to open the Video Text Tracks file natively in your browser.
node user-upload-workflow/google-video-transcription/captions/create-vtt-url.js
If you change vtt to srt and try to open the sub rip text format, you'll see that it's not supported by your browser. This format can be use for captions as it can be played as a track with the video.
const url = cloudinary.url('ul-video.vtt', {resource_type: 'raw'}):
The URL created for the vtt file can be used in the setting up the Video Player.
Open the user-upload-workflow/google-video-transcription/captions/index.html file and locate the HTML and JavaScript for the Video Player
<video id="example-player" controls muted class="cld-video-player cld-video-player-skin-dark"data-cld-transformation='{ "width": 400, "crop": "fill"}'></video>
We add 2 tracks using the textTracks option. We're using the URL created in the node script above. The same URL is used for both the caption and the subtitle.
document.addEventListener("DOMContentLoaded", function () {const cld = cloudinary.Cloudinary.new({cloud_name: 'cloudinary-training'})const player = cld.videoPlayer('example-player')// add your video text tracksplayer.source('ul-video',{textTracks: {captions: {label: 'English captions',language: 'en',default: true,url: 'https://res.cloudinary.com/cloudinary-training/raw/upload/ul-video.vtt'},subtitles: [{label: 'English subtitles',language: 'en',url: 'https://res.cloudinary.com/cloudinary-training/raw/upload/ul-video.vtt'}]}});})
Set the cloudname to your cloud name in the index.html and open in browser.
user-upload-workflow/google-video-transcription/captions/index.html
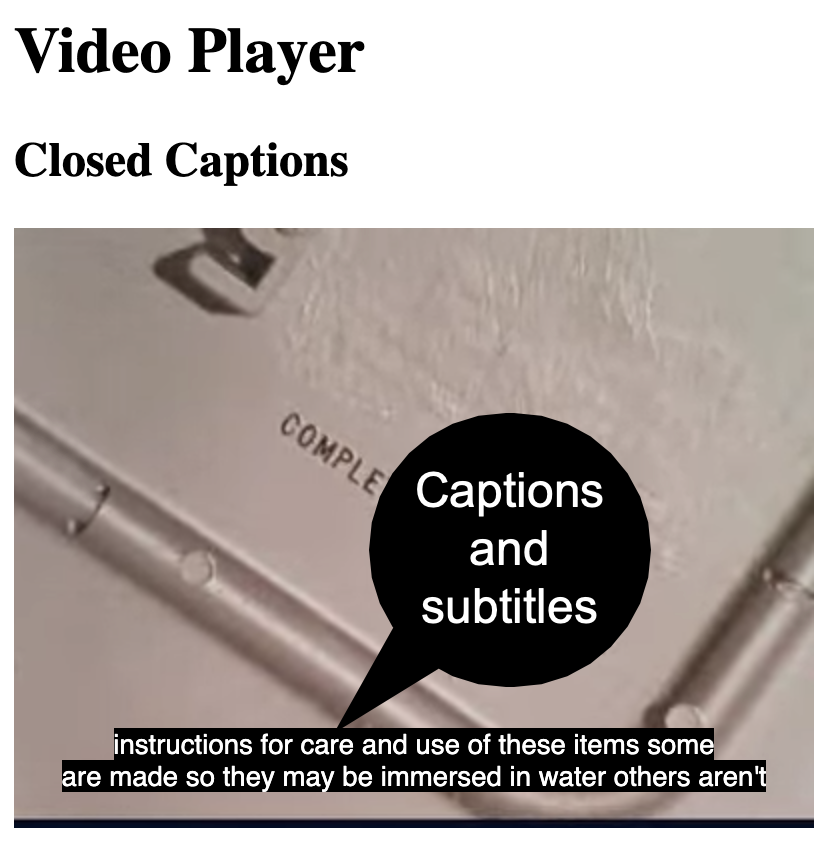
Because this is a video player you can choose to show captions or subtitles. In our case they are both the same, but the captions could be edited to include other audio information.
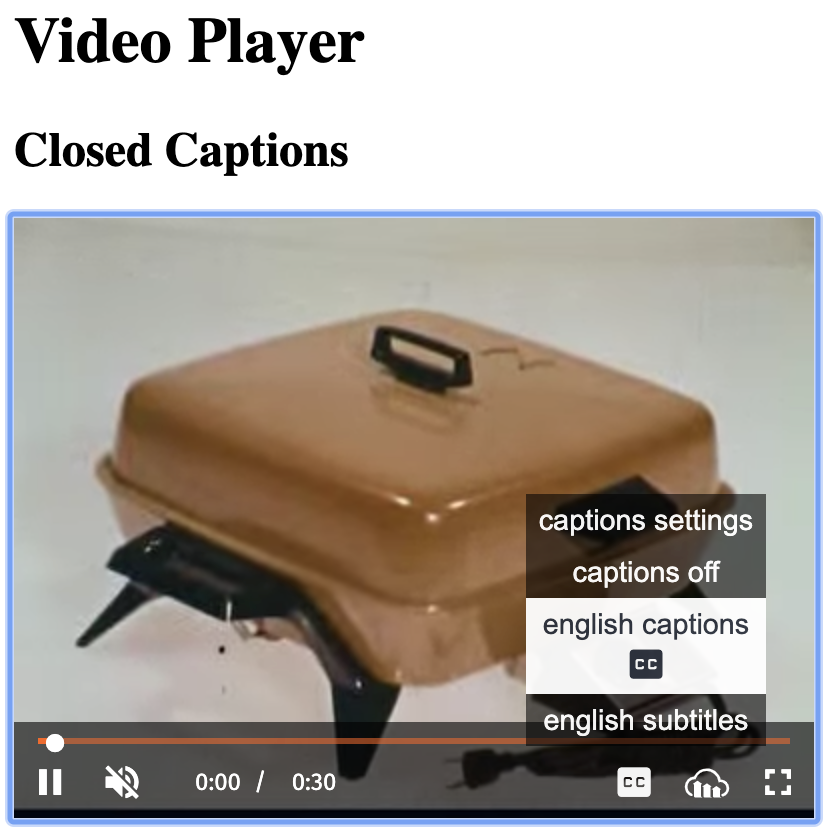
You should see either captions or subtitles at the bottom of the video. You can experiment with other settings to see that the user has control over the display of the text.
Google Video AI Moderation
When we allow users to upload assets that you will serve from your website, we want to provide ways to check that these assets meet our standards. We've looked at manual moderation with image background removal and blurriness. In those cases we did make moderation but we didn't address the problem that the asset, because it was public, could be accessed before it was approved.
Look at the chart below to better understand the flow of the asset as it makes its way to the moderation queue.
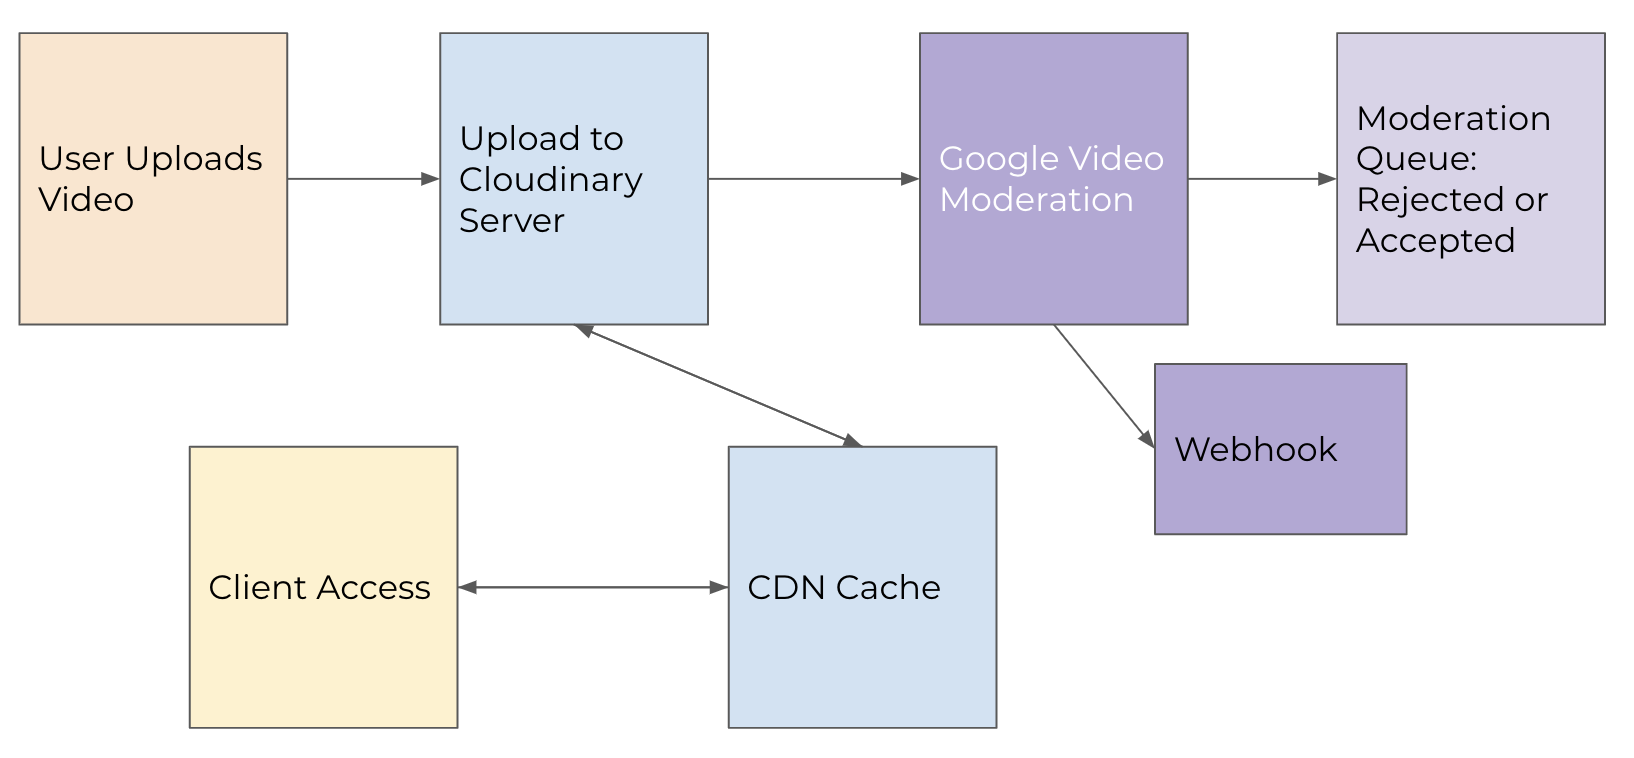
We use webhooks to alert our system that the moderation process has completed, but the moderation won't even start until the asset is uploaded and ready for request. If a user requests the asset before it's completed moderation and its something that we would reject, that asset could get cached on the CDN even though we wouldn't approve of it.
In this section we'll look at 2 ways to keep the uploaded image out of the public's view until the moderation process is complete and the asset is approved. The two techniques will look at are
- Upload the asset with an
access_controloption with a token and don't remove unless approved - Upload the asset as
privateand put it in a holding directory until approved and thenrenameto make it public and move the directory from which it will be served
Steps in Moderation with Google Video Moderation
- Your users upload a video to Cloudinary through your application.
- The uploaded video is sent to Google for moderation.
- There are multiple levels of rejection to choose from depending on your threshold for violence and pornography with “possible”, “likely” or “very likely” with “likely” being the default.
- The video is marked as either approved or rejected based on the results returned by Google.
- An optional notification callback is sent to your application (webhook) with the video moderation results.
- A rejected video is moved to a secondary backup queue, and you may want to clean this up to keep your media library organized.
- Moderated videos can be listed programmatically using Cloudinary's Admin API or interactively using the Media Library in your account console.
- You can manually override the automatic moderation results using the Admin API or the Media Library
Google Video Moderation Add-on
Navigate to the Add-ons page in and select the free plan.

Exercise: A Rejected Video
We can restrict client access by adding access_control:token. Recall that we used the access_control option with anonymous and a start and end date to add time based access control. We can use the token access control even if we though we don’t support.
If we comment out the access control option, we’ll see that we have access to the video before moderation is complete with no access control.
When we add access control to the upload, and the video is restricted When moderation is complete we can remove the access control and delete any rejected videos to save on storage costs.
node user-upload-workflow/google-video-moderation/rejected/upload-video.js
cloudinary.uploader.upload('./assets/video/hot-tub.mp4', {resource_type: 'video',public_id: 'hot-tub',access_control: [{ access_type: 'token' }],moderation: 'google_video_moderation:possible',notification_url:'https://webhook.site/17a3d46c-5d18-46b0-ab6c-94b12d7f645c'}).then(result => {console.log(result)console.log(result.moderation.repsonse)}).catch(error => console.log(error))
The video will go into a pending state while Google is processing it. If you go to the Media Library and look at the video before the moderation process is complete, you can see it as restricted.
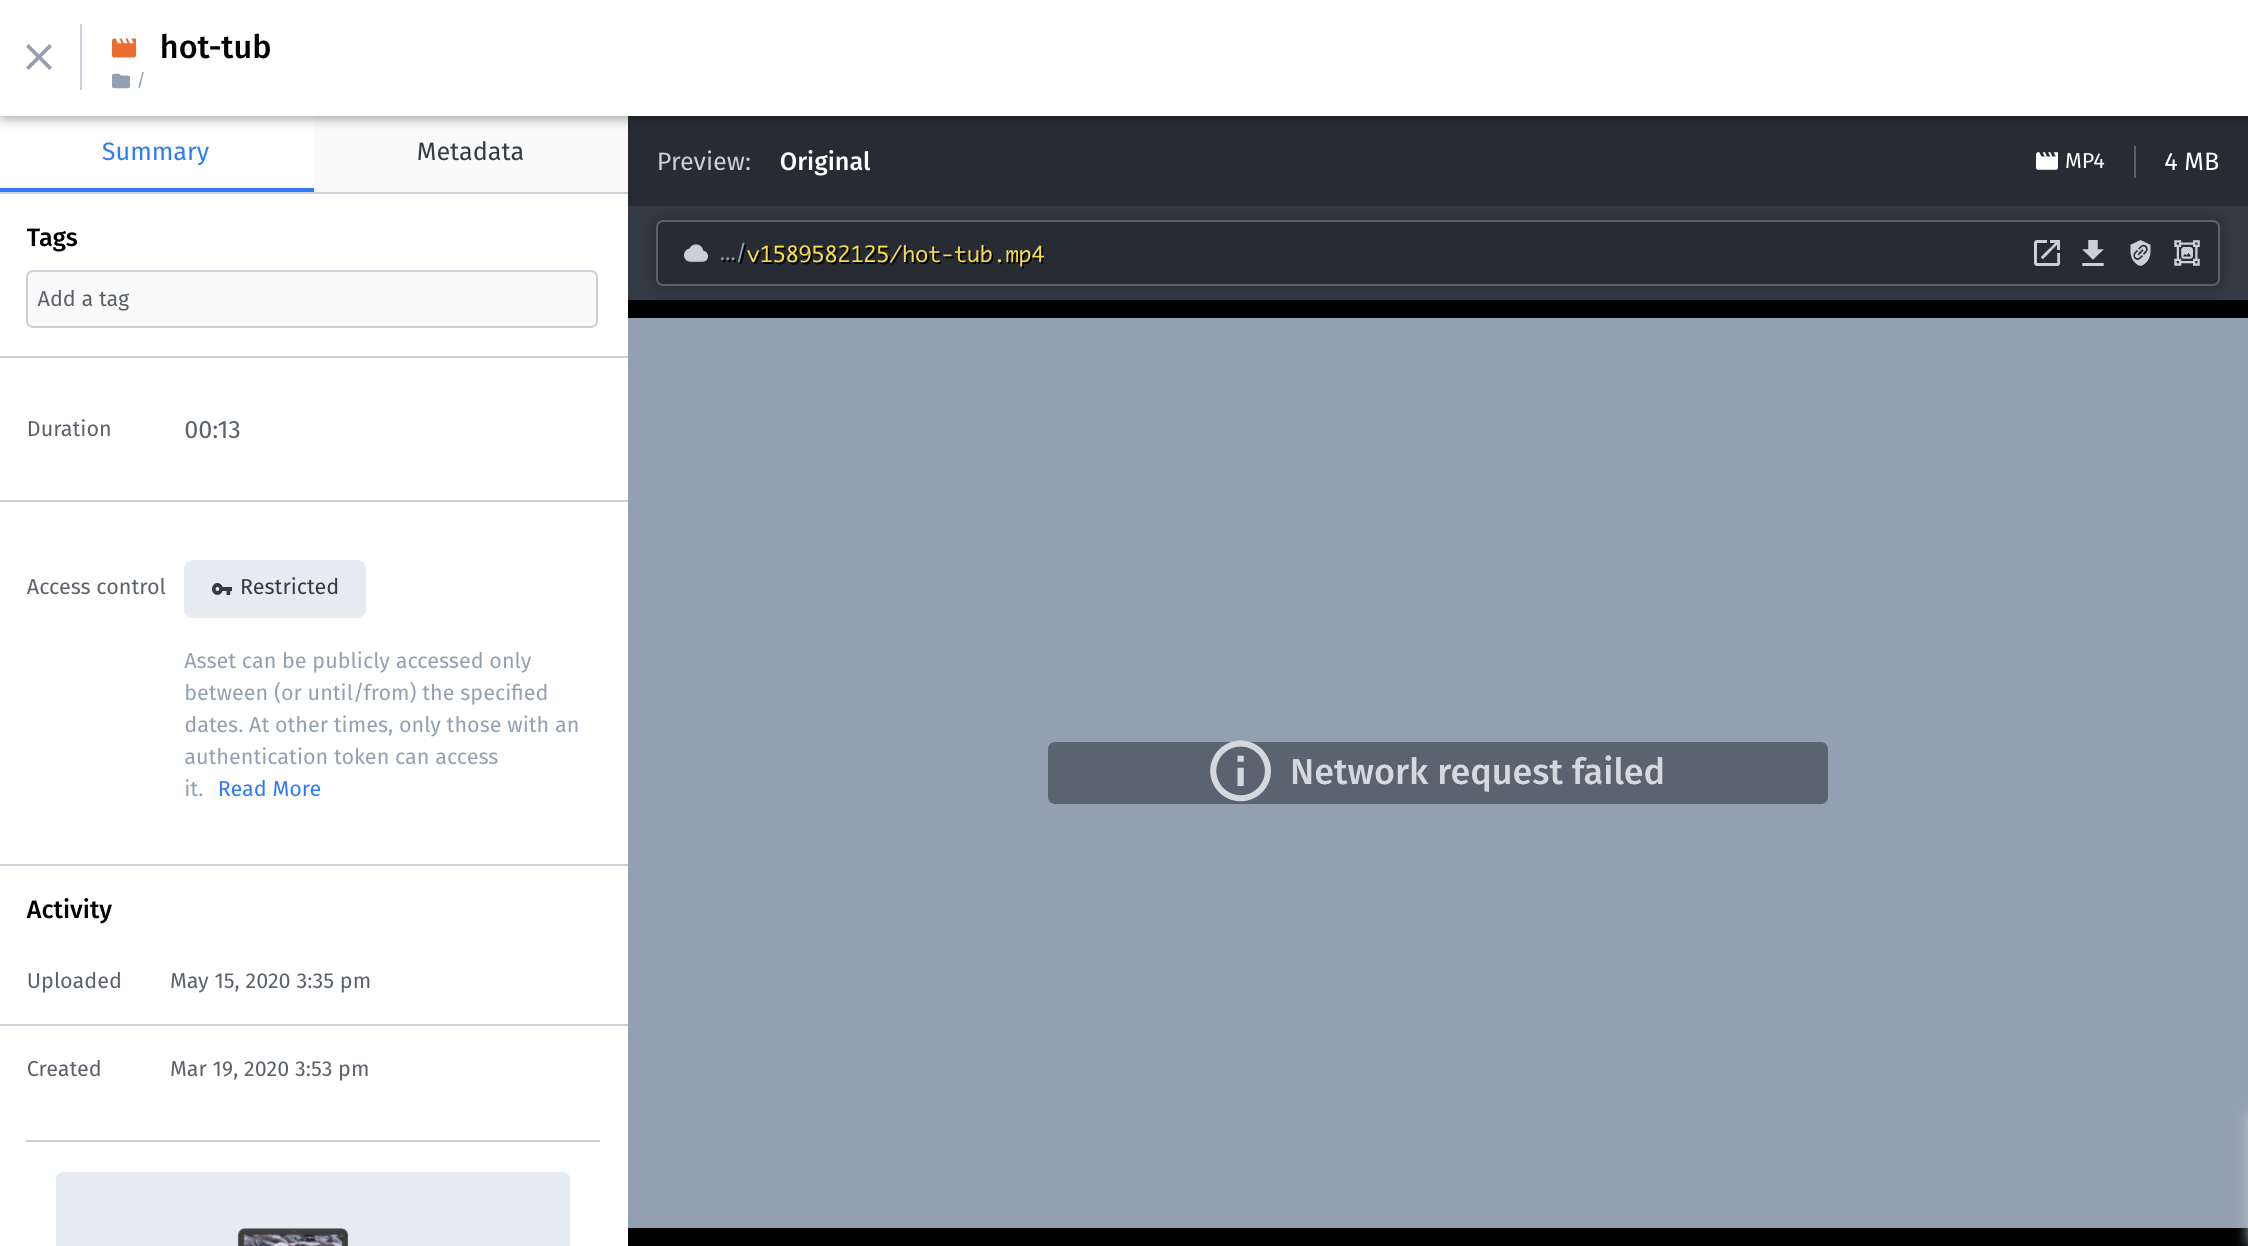
Once the moderation processing is complete, you won't find it in the Media Library if it has been rejected. Instead, you can go to the Google Video Moderation queue and see that it is rejected.

If you check the website.hook final response, you'll get detailed information on where the pornography or violence was detected.
{"moderation_response": {"moderation_confidence": "POSSIBLE","frames": [{"pornography_likelihood": "POSSIBLE","time_offset": 0.415886},{"pornography_likelihood": "POSSIBLE","time_offset": 1.5739779999999999},{"pornography_likelihood": "POSSIBLE","time_offset": 2.422259},...
Since we indicated a threshold of possible, the video was rejected. This conclusion can be found at the bottom of the response.
"moderation_status": "rejected","moderation_kind": "google_video_moderation","moderation_updated_at": "2020-05-15T22:32:19Z","public_id": "hot-tub","uploaded_at": "2020-03-19T22:53:48Z","version": 1589581905,"url": "http://res.cloudinary.com/pictures77/video/upload/v1589581905/hot-tub.mp4","secure_url": "https://res.cloudinary.com/pictures77/video/upload/v1589581905/hot-tub.mp4","etag": null,"notification_type": "moderation"
Manage the Rejected Queue
We need to manage both the rejected and approved queues. We might fire off the script below on a periodic basis to remove rejected videos. We're using the Admin API for this, so the more we can bundle rejections, the less quota we'll use.
You could start with just listing the rejected video. While the response shows the URL for the video, you won't be able to view it because its rejected. In addition, its still has the token access control, so its restricted.
user-upload-workflow/google-video-moderation/rejected/list-rejected-videos.js
{"resources": [{"asset_id": "1c0c00f6a8c40d277369708a14726b0a","public_id": "hot-tub","format": "mp4","version": 1589582125,"resource_type": "video","type": "upload","placeholder": true,"created_at": "2020-03-19T22:53:48Z","bytes": 0,"width": 720,"height": 1280,"backup": true,"access_mode": "public","access_control": [{"access_type": "token"}],"url": "http://res.cloudinary.com/pictures77/video/upload/v1589582125/hot-tub.mp4","secure_url": "https://res.cloudinary.com/pictures77/video/upload/v1589582125/hot-tub.mp4"}],"rate_limit_allowed": 500,"rate_limit_reset_at": "2020-05-15T23:00:00.000Z","rate_limit_remaining": 499}
Use a combination of the Admin API resources_by_moderation and the Upload API destroy to clear out the rejected queue.
node user-upload-workflow/google-video-moderation/rejected/destroy-rejected-videos.js
cloudinary.api.resources_by_moderation('google_video_moderation', 'rejected', {resource_type: 'video'}).then(result => {// delete anything that's rejectedfor (const video of result.resources) {cloudinary.uploader.destroy(video.public_id, {invalidate: true,resource_type: 'video'}).then(result => {console.log('destroying: ', video.public_id)console.log(result)}).catch(error => console.error(error))}console.log(result)}).catch(error => {console.log(error)})
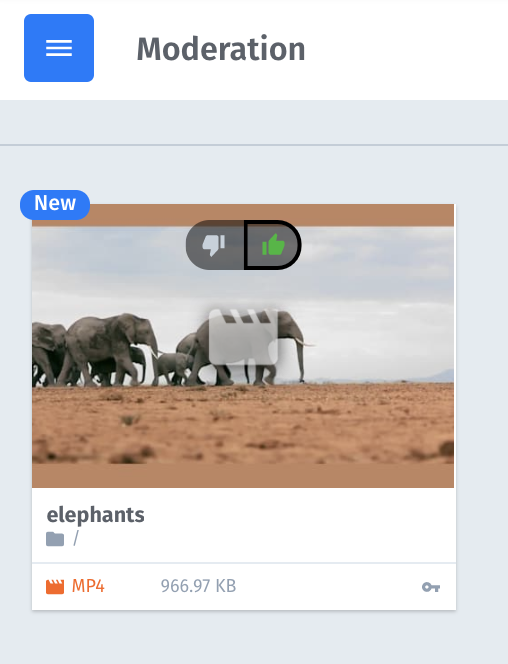
Exercise: An Accepted Video
Now, we'll upload a video that we know will be accepted. We'll use the same access_control setting to restrict the video until its been put into the approved queue.
node user-upload-workflow/google-video-moderation/approved/upload-video
cloudinary.uploader.upload('./assets/video/elephants.mp4', {resource_type: 'video',public_id: 'elephants',access_control: [{ access_type: 'token' }],moderation: 'google_video_moderation:possible',notification_url:'https://webhook.site/17a3d46c-5d18-46b0-ab6c-94b12d7f645c'}).then(result => {console.log(result)console.log(result.moderation.repsonse)}).catch(error => console.log(error))
Event though we know this video will ultimately be approved, it is restricted because of the access_control setting.
Once moderation is complete, we'll see the video in the approved queue, but it's still restricted.
We can remove the restriction by removing the token setting.
node user-upload-workflow/google-video-moderation/approved/reset-access-control-uploaded-video.js
Again, using a combination of the Admin API get a list of approved videos and then update the access_control to anonymous to remove the token and make the video public.
cloudinary.api.resources_by_moderation('google_video_moderation', 'approved', {resource_type: 'video'}).then(result => {// remove tokens from approved videosfor (const video of result.resources) {cloudinary.api.update(video.public_id, {resource_type: 'video',access_control: [{ access_type: 'anonymous' }],invalidate: true}).then(result => {console.log('no version url:',cloudinary.url(result.public_id, {resource_type: 'video',format: result.format}))}).catch(error => console.error(error))}console.log(result)})
Authentication Exercise
We'll look at another technique for restricting access to a video until moderation is complete. In this case, we mark all uploaded videos as authenticated and we put them in a separate folder.
node user-upload-workflow/google-video-moderation/approved/upload-authenticated.js
All videos are private and put in a directory named moderated
cloudinary.uploader.upload('./assets/video/elephants.mp4', {folder: 'moderated',use_filename: true,unique_filename: false,resource_type: 'video',type: 'authenticated',moderation: 'google_video_moderation:possible',notification_url:'https://webhook.site/17a3d46c-5d18-46b0-ab6c-94b12d7f645c',invalidate: true})
These videos will remain inaccessible until we've completed the moderation process and marked the video as approved. The script uses the Admin API to get a list of approved videos. Then it uses the Upload API to rename the videos and in the process change their type from authenticated to upload making them public. We also change the name of the public id by removing the directory through string manipulation. This will put the video in the root of the cloud and allow public access.
node
cloudinary.api.resources_by_moderation('google_video_moderation', 'approved', {resource_type: 'video'}).then(result => {// move any approved videos out of moderation folder, and set as publicfor (const video of result.resources) {if (video.type === 'authenticated') {const newPublicId = video.public_id.substring(10) // removing 'moderated' folder name and slashconsole.log('video.public_id',video.public_id,'newPublicID',newPublicId)cloudinary.uploader.rename(video.public_id, newPublicId, {resource_type: 'video',type: 'authenticated',to_type: 'upload',invalidate: true,overwrite: true}).then(result => {console.log('new version url:',cloudinary.url(result.public_id, {resource_type: 'video',format: result.format}))}).catch(error => console.error(error))}}
After the script above is run the image will be moved from the moderation directory to the root. The approved video is now ready to serve with public access.
Summary
Using Google Speech to analyze video content in order to create transcriptions which can be use for subtitles and captions Using Google AI for content moderation that can flag pornography and violence and you can use Admin or Upload API to remove rejected videos. We analyzed the gap between upload and async add-ons processing and how to prevent access to assets not approved The code in these work-flows can be integrated into your back-end using a notification queue which we mocked with webhook.site.